UTM, MGRS, and USNG Coordinates on USGS Topographic Maps
All USGS topographic maps printed in the last 30 years or so include either UTM grid lines, in black or UTM grid tick marks, in blue, on the margin of the map. The UTM Grid lines are also used with MRGS and USNG coordinates.
Printed UTM Grid Lines

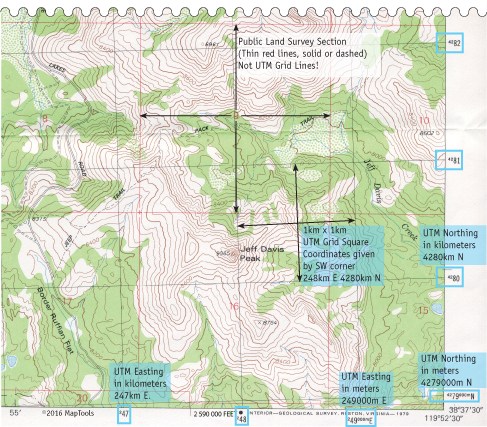
The map has grid lines spaced every kilometer or 1000 meters. The grid is labeled with UTM coordinate values. The vertical grid lines determine East-West position and the horizontal grid lines determine North-South position.
Look along the bottom edge of the map at the labels for the vertical grid lines. The label, 249000mE, reads "two hundred forty nine thousand meters East." The label, 248, is an abbreviation for, 248000mE. The two grid lines are 1000 meters apart. The horizontal grid lines are labeled in a similar manner.
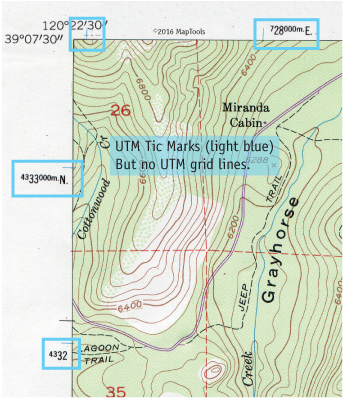
UTM Tick Marks, No Grid Lines

Since many USGS 1:24,000 scale topographic maps do not have grid lines printed on them, you will need to draw them in by hand. Start by finding a flat surface to work on. Use a straightedge that is long enough to draw a line across your map. Two to three feet long is a good length.
Line the straightedge up between two corresponding UTM tick marks along the neat line (the edge) of the map. Remember that UTM grid lines are not exactly North-South or East-West anywhere but in the center of a zone. This means that the grid lines will not be parallel to the neat lines.
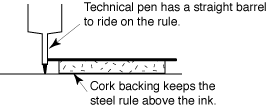
Using a mechanical pencil or a fine pointed pen draw a line between the two tic marks. If you are using a pen, select one that has waterproof ink. In addition, you will want to use a straightedge that has the edges lifted off of the paper. This will help keep from leaving an ink smudge when you move the straightedge. High quality straightedges will often have a thin piece of cork stuck to the bottom. This helps keep the rule from slipping, and keeps the edge off of the paper. A piece of masking tape centered on the bottom of your straightedge will work also. Occasionally wipe of the edge of the straightedge to avoid any ink build up.

Gridding maps is tedious work. I wish the USGS would print the grid line on all of their maps. But even then, we would still need to grid our existing maps. As you can see this is not the kind of thing you want to do on the hood of a truck or using a flat rock. Grid your maps before you need them in the field! In a pinch you can fold the map over on itself and use the edge of the paper as a straightedge.
Photocopies of Maps
Frequently, you may use a photocopy of a small portion of a map rather than the entire map. This cuts down the wear and tear on the original map and allows several copies to be distributed among a group.
Make sure you transfer at least the large-type portion of the UTM grid markings onto the photocopy. It's also helpful to provide scale and contour information. Preprinted scale bars on Post-It note paper are available or just make a copy of the scale bars and "cut and paste"
Avoid the temptation to change the scale of the map with the zoom on the copier. If you use maps often you will have a good sense of distance. Alter the scale and it will be harder to judge distances. Plus your overlay tools will no longer be useful.
If you do change the scale using the copier, be sure and copy the scale bars at the same time, so they will correctly reflect the new scale.
If you are marking roads, trails or boundaries on the photocopied map, avoid obscuring the underlying feature with the mark. Pencil lines will usually allow the feature to show through as will highlighter pens.
There is nothing more frustrating than needing to know what is under a big black mark on your copy of the map.