Plotting a bearing on a map using a protractor
Sighting the bearing
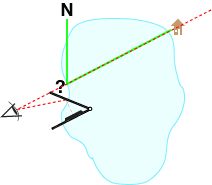
To determine our location we are going to combine two pieces of information on our map. We know that we are somewhere along the shoreline of the lake. Using a compass we can sight a bearing to our cabin across the lake. When we plot the bearing on our map, our location will be where the line between our location and the cabin crosses the shoreline of the lake.

Determine a rough direction to the target
Use a compass to get a general sense of direction for North, South, East, and West. Identify on of the eight compass points (N, NE, E, SE, S, SW, W, NW) that roughly describes the direction to our sighting target. In our example at the lake, our cabin is NE of our current location. Refer back to this "reality check" occasionally during plotting to make sure what you are doing makes sense.
Sight the bearing to the target
Using our compass we have sighted a bearing to our cabin of 60° from Magnetic North. The north reference is an integral part of any bearing. Make sure you include it when you say or write a bearing. We can abbreviate to either 60° Mag. or just 60°M

Adjust the north reference to match the map
We want to plot our bearing onto the map relative to Grid North. Looking at the declination diagram on the map, we see that in this part of the north woods, Magnetic North is 5° east of Grid North. We will add 5° to our bearing to convert it from a Magnetic bearing to a True bearing.
If you don't already understand north references and converting between them, you should take a detour to our North Reference Tutorial.
Our bearing was taken from an unknown location, towards a known location. When we plot it on the map, we will start plotting at the known location, and extend the bearing line back towards the unknown location. This is known as a back bearing.
For more information on forward and back bearings, see our tutorial on forward and back bearings.

Familiarize yourself with your protractor
Before you set you protractor down onto the map, take a good look at it and make sure you understand the markings. For navigation purposes, we use an angular measurement system where a circle is divided into 360 degrees. 0° (and 360°) are aligned with our north reference, 90° is to the East, 180° to the South, and 270° to the West.
Is you protractor marked in degrees? Are the marks spaced at one, two, or five degrees? Is it a full or half circle protractor. Are the numbers increasing as you proceed in a clockwise direction? Many protractors used for drafting are numbered in both clockwise and counterclockwise directions. Make sure you use the correct set of numbers. Some protractors are numbered in four 90° quadrants, and are a probably not a good choice for navigation use.
Find the center point for your protractor. You will place the center of the protractor on the known point where you are plotting your bearing. The center of your protractor will be at the intersection of a line drawn between 0° and 180° and a line between 90° and 270°
Determine what lines to use to align your protractor with your north reference lines on your map. A protractor that is well suited for navigation will have numerous parallel lines aligned with 0° to 180° on the protractor.
Step by step procedure for plotting with a protractor


Techniques for extending the bearing line
One of simplest techniques is to place a small pencil mark on the correct bearing at the edge of the protractor. Now place a straight edge between the known point and the mark you made at the edge of the protractor. Draw a line between these two points, and extend it as far as you need to. This is what we demonstrated in the above example.
Another technique is to use a piece of thread to show your bearing line. Many of our tools with protractors have a hole in the center. Place a piece of thread or a small string through the center hole and tie the ends together. (The string should be a bit longer that twice the distance you might want to extend a bearing.) Pull the string tight, line it up with the bearing on the edge of the protractor, and use the straight line created by the thread to follow the bearing away from the edge of the protractor. MapTools does not supply the string. Some field expedient string sources include, thread from a sewing kit, a thread from the core of a piece of para-cord, dental floss. Some folks like red thread, others prefer black, and some want a loop of thin elastic cord. If your string is too short to make a loop, tie the end to a small twig, a button, or something that is bigger than the hole in the tool.
Additional techniques for plotting a bearing...
- Plotting a bearing using a baseplate compass
- Plotting a bearing using a baseplate compass adjusted for declination
- Plotting a bearing using a straight edged lensatic compass
- Plotting a bearing using a round lensatic compass
Continue this tutorial on plotting a bearing with these links:
Plotting a second and third bearing to confirm your positionUsing bearings to locate a distant target